
There are lots of domain providers that let you host websites for free or at a minimum cost. WordPress.com is one of the most popular of them. This article provides step-by-step guideline to create, host and customise websites in WordPress.com (not to be confused with WordPress.org) from scratch for no cost at all.
Disclaimer: Creating a website for zero cost has a lot of limitations, which is obvious. You can’t have your unique domain name owned by you, instead you will get a sub-domain under the domain wordpress.com. Plugins can not be used, no e-mail service and many other services are not available in the free plan.
Table of contents
(If you already have a WordPress account and a website, please skip the first two sections)
Creating an account and getting started
1. Create a WordPress Account
The first step is a no brainer. You need to visit WordPress.com and use your e-mail address, set a unique username and password to create a WordPress account. Or you can use your Google or Apple ID instead. Although using e-mail address is preferred.
2. Choosing domain or sub-domain name
In the next page they will ask you to input a domain name. A domain name is the address people type in their browser to connect to your website. For example, the domain of Amazon is www.amazon.com. If you already have a domain name registered with some other web hosting site you can transfer the domain to WordPress.com. Or you can register a new domain.
Registering domain with WordPress will cost a little money. But instead you can register a sub-domain under WordPress.com for free! Just input a domain name which is not already taken. There will be options for choosing different domain name suffix (e.g. .com, .org, .blog etc.) which can be bought for a cost. But since we are going for the free plan, we will choose the free sub-domain option, for example – exampledomain421.wordpress.com.

WARNING! Be careful while choosing the domain or sub-domain name. Because this is the identity of your website, the face by which everyone knows your website. Choose it wisely. You can change every other thing of your website, but not the domain name. Changing the domain name means changing the website itself and the changed domain will be considered as a brand new website to the search engines. You will lose all the search engine rankings.
3. Choosing Hosting Plan
In the next step they will ask you to choose between personal ($4/month), premium ($8/month), business ($25/month) or eCommerce plan ($45/month).
Although you already have chosen to go with the free sub-domain, they will push you to buy a domain. But you can choose neither of them and go for the free plan by selecting “Start with a free site“. It will take a few seconds and boom! Your website is created!
But that’s just the first step. At this stage your website will be displaying some default contents. But don’t worry it’s only visible to you. If anyone tries to visit the website using the website address, a message will be displayed saying “Coming Soon”. You have a whole lot of works to do before you make your website is suitable to go online. You will be landed on the dashboard from where you can manage the website.

Completing the Primary Set Up
Click on the “Get Started” button to complete the primary set up.
- Give a Title to your website. This title does not have to be unique and usually is the name of your business or blog. For instance, the title of this website is “Ulta Palta Blogs” and it’s the name that is displayed at the top of the pages as well as on the tab of your browser.
You can also add a Tagline below the website title. A tagline describes your website in a few words, usually within 6/7 words. For example, the tagline of this website is “A Personal Blog on Travelling, Sports & Photography”.
Add a logo to your website, which will be displayed beside, above or under the website title according to the theme you choose.
For this example, we named the website “Example Website” and the tagline as “An example tagline”, but did not upload any logo.
Don’t forget to save the settings before moving back to the dashboard. The Title and the Tagline can be changed anytime you wish. - The next option will be to set a Navigation menu. It is better to skip it for now, because you will be making a lot of changes in the navigation menu later and have to take your time to set up the menu.
You will have a menu by default with the menu items Home, Blog, About & Contact. These items link to your four default pages – Homepage, Blog page, About page and Contact page. - Then they will suggest you to edit your Homepage. There are plenty of customisation options to design the homepage (or any other page). You might want to skip this step too, because it takes a lot of time and planning to set up the pages and you should take your time to build an attractive homepage by customisation.
We have discussed in depth how to customise pages in the section Using the Block Editor.
By default your homepage will look somewhat like this –

- The next step is to launch your website. You can go ahead and launch the website, even if the website is not ready. No one is going to visit your website just after you launch it, I promise!
After you press launch they will push you again to buy a custom domain by upgrading to a paid plan. But you can always Skip Purchase and Continue with your free site. (You will be getting a lots of e-mail and notifications to upgrade to a paid version. So better get used to it.) - If you did not verify your e-mail (the one you provided while creating the WordPress.com account) you will have to verify it by clicking the link sent to the e-mail address.
- They will ask you to download the WordPress app to manage your website from your mobile device. It’s a good idea to have the WordPress app installed in your mobile phone. It will make managing the websites much easier on the go.
And just like that your website will go public! You can send a link to your website (in this demo it is exampledomain421.wordpress.com) to your friends & family and they can view it in their browser! But don’t do this yet, you should organize and reshape the website before you start sharing the website link.
Customizing the website
Although not as much as a Blogger website, you still will have a lots of freedom while customizing your website. The whole customization process takes place in two tools – the Dashboard, which can be accessed by clicking “My Sites” & the WP Admin page, available at the lowermost section of the Dashboard option.
a) Choosing the perfect theme
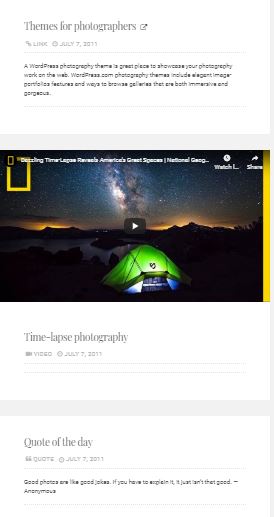
The first step of customising is to choose a theme suitable for your niche. Not every theme is perfect for you. Every theme is designed focusing on a specific purpose. The themes that are meant to showcase your photography will come with large photo grid and visually attractive blocks, themes built for blogging will have nice grids to display your blog posts in an organised way and so on. You need to find the perfect theme that matches your requirements.
To choose a perfect theme for your niche, go to My Sites → Design → Themes and scroll down to find the Advanced Theme search bar. From here you can filter themes by Subjects, Features, Layout etc.

But if you are looking for a specific theme, you can’t search a theme by name in this section. To search for a theme by name, go to WP Admin → Appearance → Themes.
How do you know if a theme is suitable for you?
Well, if you click on the theme info, you can get a good idea about the features of the theme. But the best way to do it is to try the theme first hand.
Use the Live Demo option to have a look around the theme. The live demo is viewed in a pop up window, but if you wish to view it in another tab just like you would do for an actual website, all you need to do is right click on any link (a menu item, a post, or any other link) on the previewed website on the pop up window and click open in a new tab.
What to look for when choosing a theme?
There are some features you should look for when you choose a theme. You can’t obviously get all in one, but you always can look for the features you think are a must for your website.
- No. of Menus Allowed to Display
Usually themes have positions for 2 menus – one for regular menu where link to your pages or categories can be put and the other for social menu where your social icons will be displayed. But some themes support displaying an extra menu as well.
An extra menu can be an advantage to put different links in an organised way. If you prefer to display lots of items in the menu, you can choose a theme with 3 menus to split the menu items into two of them (one of the menus is reserved for the social icons) - No. of Widget Areas and Their Positions
You should consider how many widget spaces you need and where they appear in the theme. There are usually two areas to show widgets – above the footer and the sidebar. Some themes even support two sidebars! The sidebar could sometimes be hidden at the side of the screen, and accessible by clicking a button.
Further, footer widgets can be shown in 1, 2, 3 or even 4 columns. The sidebar widgets can also have a number of variations, although they will always be in a single column (two columns if there is two sidebars). - Types of Page Templates Available
Pages could be of many types: Default page – with sidebar(s) and the contents, Full Width page – with no sidebar(s) and the contents of the page takes full width of the screen, No Sidebar page – with no sidebar but the contents are only centred and does not take the full width, Testimonial page – specially designed to view testimonials of clients, Contributor page – suitable to display the team members and their bio.
A particular theme may not support all types of page templates. So before choosing a theme, go through the theme info and see which page templates it supports. Sometimes you might need a full width template page for creating an attractive static homepage. If you plan to do so, make sure that your theme supports this page template. - Look of the Archives page
The Archives page is the page where all or a portion (a certain month, year, tag or category) of your blog posts are shown in reverse chronological order.
Some themes may display the posts in a single stacked column, which some bloggers find suitable. But for Newspaper or Magazine websites, grid view of the archive page is more appropriate.


- If There Is Any “To The Top” Button
A very few themes have this little feature. They have a button, usually at the bottom of the pages, to bring the user back to the top of the page.
It may seem very insignificant, but sometimes this feature can go a long way in terms of user comfort. It will also help increase the time an user spends on your website. After reaching the bottom of a page an user can easily reach the top of the page using this button and visit some other pages, or instead can leave the website finding no such button because they did not like to scroll all the way back to the top.
- Is It Visually Attractive or Does It Concentrate More on Typography?
If your website is about Photography, you need a theme that emphasises the images more than the words. On the other hand, if the website is a blog site, you might want the theme to be more concentrated on typography and less on images. For a magazine website you will need a combination of both.


Choosing theme can be a bit difficult, because it’s very hard to find the “perfect” theme that meets all your requirements. You can see our theme review series to find a good theme suitable for your niche. You can always change your theme anytime you want.
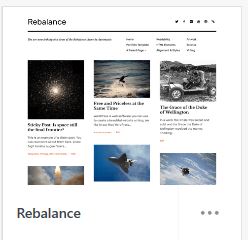
For our example website we have chosen the theme Colinear. This theme has 2 sidebars, and 3 footer widget areas. And after a few customizations (which I’ve discussed later in this article), this is what it looks like –

b) Creating or deleting Pages if necessary
As mentioned previously in this article, you will have 4 pages by default –
- A Home page – where people land on when they visit your website.
- An About page – which is meant to display information about you or your company.
- A Contact page – where there will be a contact form by default. By filling and submitting it people can contact you via e-mail.
- A Blog page where all your recent posts will be displayed.
You can manage all your pages from My Site → Pages, or from WP Admin → Pages. You can customize all of the pages as you wish using the Edit option. If you wish to add a new page or permanently delete any of the pages you can do that too from here.
Based on your niche and purpose, you may need to add additional pages to the website. For example you may want to add a page for displaying the Privacy Policy of your website in a new page, or you may need a page for showcasing the awards you got.
Also you might not need some of the default pages. Someone might not want to show any Contact page in their website, or (s)he might not want any About page. It is better to remove the unnecessary pages than to leave them unused. No one wants to visit the a page only to find some default contents or a blank page.
In the Homepage, you can choose to display the latest posts (suitable for a blog site), or you can create a customised static page for the Homepage and display the latest blog posts in another page (suitable for business website).
To do so, go to WP Admin → Settings → Reading or My Site → Design → Customise → Homepage Settings and from there, in the section named “Your homepage displays” select an option from Your Latest Posts or a static page.
If you select A static page for your homepage, you have to select another page for Posts page where your latest post will be showed.
For changing or selecting the Page Template (Full Width, No Sidebar etc.), while editing a page in the block editor go to Settings → Document → Page Attributes.
Use the Block Editor to customise and reshape your pages. You can edit all of the pages except the Posts page (the page selected to display the latest posts). We have discussed in depth how to customise pages in the section Using the Block Editor.
c) Using the Customiser
This is the most essential tool for customising the website. To access the customiser go to My Site → Design → Customise.
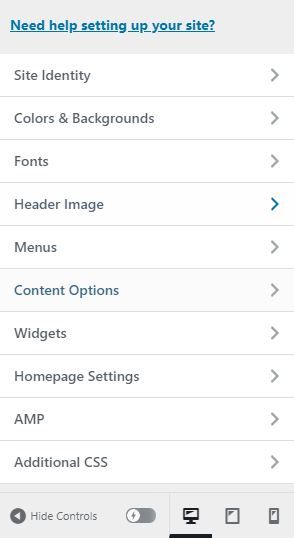
After opening the customiser, all the controls will be displayed on the left of the screen and a real time preview of the website will be displayed on the right. You can toggle between Desktop, Tablet or Mobile view.
Some of the control options and what can you do with them are discussed here-
1. Site Identity
Set your Site Title – the name of your website, Tagline – a few words to describe your website which will be displayed just below the Site Title, Site Logo – a logo of your blog or company which will be displayed above or beside the Site Title, and the Footer Credit. You can choose to hide the Site Title and Tagline.
You can set the Site Icon from here. A Site Icon is a unique icon for your site. It is shown across WordPress.com, in your visitor’s browser tab, in widgets like Blogs I Follow, and as a bookmark or home screen app icon when saved to a browser or phone. The image for the icon must be square, or if it is not, you can crop it to make it square when selecting the icon.
These settings are also available from My Sites → Manage → Settings → General, or WP Admin → Settings → General.
2. Colours & Background
From this option you can change the background colour, text colour etc. You can even set an image or pattern as the background. Changing the colour settings in a right way can give the website a completely unique look.
3. Fonts
Change the fonts from here to match the theme. You can also make the fonts smaller or bigger as you wish.
Always try to use fonts that are easy to read and comfortable for eyes.
4. Header Image
Set a header image that will be displayed at the top of the pages. It’s more like a cover photo, but much narrower.
You can add a custom Header image relevant to your website.
5. Menus
You can create any number of menus you want from here. But only a particular number of menus can be displayed as supported by your theme.
While creating a menu, you can set a page, category, tag, post, or a custom link as items in the menu. For social menu, you don’t need to worry about the icons, just put the full links to your social media accounts which are supported by your theme and the respective icons will automatically be loaded.
6. Content Options
Here you can select whether to display the full post or just the post excerpt in post page or archive pages. This is an important option of customisation. You should set it to just the post excerpt. Because it is not necessary that people will like to read all of your posts. And if full posts are displayed in the homepage or archive pages then in order to skip a post they don’t like, they have to scroll down the whole post to reach the next post, which is not reader friendly at all.
You can also choose to display or hide featured images on Blogs and Archive pages. If you want to minimise the page size of your website, you can choose the hide option here. This will increase the loading speed of your website, but also compromise the look of the website pretty significantly.

There is also an option to show or hide the author bio after each single post. For websites with multiple author, this can be a good way of introducing the author of the post to the readers.
(Note: All themes don’t support all of the Content Options in their customiser. Some of them even have no Content Option at all.)
7. Widgets
This is perhaps the most important part of the customisation process. Apart from the post itself, the widget areas contain rest of the contents of your website. So you need to set this up carefully.
According to the number of widget areas your theme supports, you can have 1-2 sidebar widget areas and 1-4 footer widget areas. Some themes may not even support sidebars.
If your theme does support sidebar (which they more likely will) but you don’t want any sidebar, then adding no widget in the sidebar widget will automatically remove the sidebar and the pages will become no sidebar page type or full width page.
There are a lot of widgets that can be added in the widget areas. Some of the important ones are:
- Archives – a list or drop down menu of your monthly post archives
- Blog Stats – a widget to show off the total number of visits to your website
- Calendar – a calendar of your posts (perfect widget for newspaper websites)
- Categories – a list or drop down of the categories (a must have)
- Custom HTML – a custom HTML code box, great for inserting third party HTML codes.
- Facebook Page Plugin – a small box showing your Facebook page name and the like button (a must have if your target visitors are from Facebook)
- Flickr & Instagram – showcase for your Flickr or Instagram photos (a must have for Photography related website)
- Follow Blog – an e-mail sign up form that makes it easy for visitors to subscribe to your blog (a must have. Almost all the visitors of your website visit your website and never comeback. If they subscribe to your blog, some of them may visit your website when they get updates of your blogs via e-mail. Remember, even non-WordPress user can subscribe using this form)
- Follow Button – an one-click follow button (a must have. Makes it easy for WordPress users to follow your blog. People prefer a single click follow rather than entering their e-mail address for following a blog)
- Gravatar & Gravatar Profile – two perfect widgets to introduce yourself. It makes it easy to build your reputation as a content creator
- Mailerlite and Mailchimp Subscriber Popup – a popup form for collecting subscriber’s e-mail (a must have for growing your website). It can be a bit hard to get your Mailerlite account approved. Mailchimp was a great option for subscriber popup, but they have recently made some changes in their system which has restricted it to premium plan only
- Navigation Menu – a great tool for displaying menu. If your theme does not have enough number of menu areas, you can use this widget as an alternative to menu area
- Recent Posts – a list of your recent posts (a must have)
- Search – a search box for users to find relevant posts in your website
- Social Icons – a list of icons to let visitors follow the social media accounts related to your website. You can link your personal account here too (a must have)
- Tag Cloud – a cloud of the tags of your website.
You may want to exclude some tags from the tag cloud. Use the tag ID (not the tag name itself) to exclude it from the Tag Cloud. To get the tag ID, go to WP Admin → Posts → Tags, then click Edit on the tag you want to exclude. See the url of Edit page to find the Tag ID of that Tag.
The url will be something like – https://exampledomain421.wordpress.com/wp-admin/term.php?taxonomy=post_tag&tag_ID=1006018&post_type=post&wp_http_referer=%2Fwp-admin%2Fedit-tags.php%3Ftaxonomy%3Dpost_tag
Here the Tag ID, as you can see is 100601.
To know more about tags, visit this detailed post about using tags – How To Make Proper Use of “Tags & Categories” in WordPress. - Top Posts & Pages – a list of your top posts and pages. You can exclude the pages if you wish. The top posts or pages are determined according to the stats of the last 3 days.
(Note: For some themes, while viewing in the preview window, the sidebar widgets might be displayed in different position than they were supposed to be. To view the actual look of the website you can hide the controls.)
Every widgets has an option named Visibility. By setting the visibility of an widget you can choose to hide it or show only for a certain page, author, tag etc.
For instance, let us suppose your website have your Gravatar widget in the sidebar. And in the About page, there is already an introduction of yourself. So the About Page will eventually display two introductions. You can use the visibility setting of the Gravatar widget to hide it only for the About page.

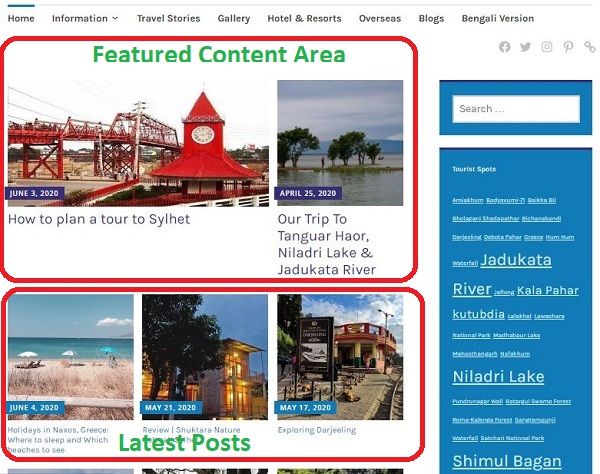
8. Featured Content
You can set a special tag for featured contents. Posts with this tag will be displayed in the featured content area. By default this tag is usually set as “featured”. But you can change it to any tag you want.
Not all theme will have this option. It will only be available if your theme supports Featured Contents.
9. Theme Options
This is a special control option only available for certain themes. Any special or unique features of the theme can be controlled by this option.
d) Using the Block Editor
The block editor is a newly introduced version of the WordPress editor. It is used for creating any page or blog post. If used properly, attractive and eye-catching posts and pages can be created with the help of it.
In the editor, click the + sign to add a new blocks.
While a block is selected, settings related to that block will be displayed in the right side of the editor. Some of the options will also be available just above the block itself.
Here are some tips for using different blocks to create a great post or page.
- Use the Cover block (an image or a video with a text overlay) at the top of the page to give a brief introduction of something. It can also be used at any other part of the page.
- The Layout Grid and Columns block can be used to split the page into different columns. Although both of the blocks seem to perform the same function, but there are some difference. The Layout Grid block has more customisation options than the Columns block.
- Use the Post Carousel block to display a slider of your posts. You can filter out certain category of posts to be displayed.
- The most common and used blocks for creating posts are Paragraph, Headings, Image, Gallery. Be smart while using the headings. Check all the settings of your image or gallery. set the size of the image or which page they link to.
Other than the regular Gallery block, there are other varieties of galleries such as Offset, Masonry, Collage and Stacked gallery. - The Blog Posts and Latest Posts blocks are great way of displaying your posts in the Home Page (static homepage).
The posts can be displayed in different styles and sizes. There are options to filter posts by categories, authors or even tags. You can also select the “choose specific posts” option to display only the ones you wish.
Note: Sometimes you may use more than one Blog Posts blocks in a single page. In that case, if a certain post belongs to two or more blocks, then it will appear only in the first block and the rest of the blocks will automatically exclude that post. - You can embed contents from other websites into your website. The most notable allowed options are GIF, Google Calendar, Instagram Posts, Map, Pinterest, Twitter, YouTube, Facebook, SoundCloud, Spotify, Flickr, Vimeo, Animoto, CrowdSignal, Imgur, Reddit, Slideshare, TikTok, Tumblr and Amazon Kindle.
- Use the Spacer and Dynamic HR block in an adequate manner to make the pages or posts simple and clean.
If not enough spaces are set between the blocks, the page will look too much crowded. Also don’t overuse it, because too much space will make your page looks empty. - Make proper use of the Button block. Insert a button where necessary to guide the users to relevant pages.
- If you don’t have time or patience to go through all these hassle, you can choose a template from the Patterns option.
Select a pattern by clicking the + sign in the post/page editor.
There are adequate number of page layout to used as a page template. To choose a page layout while editing a page, go to Settings → Document → Page Layout and select Change Layout and choose a template.
A visual representation of how the static Homepage of Ulta Palta Blogs was designed using the Block Editor –

Additional Tips
Here are some additional tips which will help customising the website.
- If your theme does not support displaying only the excerpt in the archive or blog page and shows the full post instead, you can manually set the excerpt by using the More block in the post editor.
Put a “More” block after the first few sentences. Contents before the “More” block will be displayed as an excerpt instead of the full post. But the visitors will not see the “More” block while visiting the full post.
If you want the excerpt to be different from the first few lines, just write the excerpt lines at the beginning of the post and put a “More” block after it, followed by the main post. Then from the block settings switch on the option “Hide the excerpt on the full content page”. - If you need to use a certain combination of blocks frequently every now and then, you can group them together and convert it to a Reusable Block.
A reusable block is a saved template that can be used in any future post or pages. You can also edit the contents of the reusable block from post to post. For doing so, click on the More Options button (right most button with three dots) of the reusable block and select “Convert to regular block”. - Switch on the Related Posts to be shown below each post for better visitor experience. To do so, go to My Sites → Tools → Marketing → Traffic or WP Admin → Settings → Reading and turn the “Show related content after posts” option on.
Note: Related Posts will appear only if your website has more than 12 posts of decent length.
Conclusion
The tips and suggestions mentioned in this article are just the tip of the iceberg. WordPress customisation is a huge field. It is impossible to cover everything in one article. And a blog post is never enough to learn building websites.
The best practice for becoming an expert is to try out different functionalities yourself. Hence my final suggestion is – Be creative, play around with the tools and finally built a great website.

This is SOOO helpful ☺️
LikeLiked by 1 person
Thank you, ashleyvbergstrom. Hope it helps to improve the appearance of your website.
LikeLike
Dear ,
Here i have a query , if I subscribe for personal plane (₹) , i would receive any money from them per view or what ? Cause I am running my site on free plan and I could upgrade it to next level ?
Can you clarify please 🙂
LikeLiked by 1 person
By upgrading to the personal plan ($4/month), you can have access to some extra features, but they are not enough to make money. For example-
1) You will have e-mail services
2) Storage will be increased to 6 GB (currently you have 3 GB)
3) Ads will be removed from your website (in your current free plan some ads are displayed in your website which you cannot control, you may not see the ads while logged in to your wordpress account, but someone who is not an wordpress user will see ads when they visit your site)
4) You CAN earn few bucks by selling subscriptions. You will be able to publish contents specially for Paying Subscribers. They will pay monthly or annually for these special contents. But sorry to say such subscription is very rare.
I would suggest you to upgrade to Premium Plan ($8/month). Because you need to upgrade at least to Premium Plan to-
1) Display your own ads and make money. If you have good amount of traffic to your website, you can earn by advertising in your website.
2) Collect donations.
3) Sell products and collect payments directly to your bank account through PayPal.
LikeLiked by 1 person
And No, in none of the plan, you will earn money for visits. You can only earn money if visitors click on any advertisement on your website.
LikeLiked by 1 person
Dear ,
𝖼𝖺𝗇 𝗐𝖾 𝖾𝖺𝗋𝗇 𝗌𝗈𝗆𝖾 𝗆𝗈𝗇𝖾𝗒 𝗎𝗌𝗂𝗇𝗀 𝖿𝗋𝖾𝖾 𝗉𝗅𝖺𝗇 𝗈𝖿 𝗉𝖾𝗋𝗌𝗈𝗇𝖺𝗅 𝗉𝗅𝖺𝗇 𝖻𝗒 𝖻𝗅𝗈𝗀𝗀𝗂𝗇𝗀 ?
𝗍𝗁𝗂𝗌 𝗂𝗌 𝗆𝗒 𝗊𝗎𝖾𝗋𝗒
𝗉𝗅𝖾𝖺𝗌𝖾 𝖼𝗅𝖺𝗋𝗂𝖿𝗒
LikeLike
Thanks , really appreciate 🙂👍🌸
LikeLiked by 1 person
Excellent post! Wish I had this when I started developing my site as it’s extremely helpful.
How do you find the block editor? I find it a little buggy and wish that WP did more rigorous testing prior to its release.
Many thanks for stopping by my travel and photography blog – much appreciated.
LikeLiked by 1 person
Actually, I like block editor because it gives you full control to design your page using blocks.
Using GenerateBlocks you can control more things like page hero, content template, layout, header & footer, etc.
LikeLiked by 1 person
Forgot to add, do you think it’s confusing displaying both the “Follow” button and the “Follow Blog” button on the sidebar, or should I use only one option?
LikeLiked by 1 person
First off, I really appreciate you taking your time to read this long post. These are so long that even I get tired sometimes reading my own posts haha
Now moving on to your response, WP Block editor is actually pretty good if you know how to use it. I’ve been blogging since the days of the classic editor, but the new block editor is much better than the classic editor. But there are always space to improve. And did you know that if you find the block editor inconvenient, you always have option to use the classic editor?
About the follow button, I personally think it’s good to keep them both. While the “Follow” button is only for the WordPress users, the “Follow Blog” button can be used by ANYONE to subscribe to your blog!
But if you really have to keep one, please keep the “Follow” button. The reason behind this is, it’s a single click weapon to collect followers. And trust me, people always prefer things to be done in a single click rather than typing e-mail. And it’s more likely that you will collect followers from the WordPress platform more frequently than some random clicks by non-WordPress users.
LikeLiked by 1 person
Yes, I’ve also come from the days of the Classic Editor and know I can switch. 😉
I’ve left both in and yes, I totally understand this as my background is in usability as well as technical writing.
Thanks again for sharing your tips!
LikeLiked by 1 person
You’re welcome! And I’ve checked out both of your blog! They are greeeat! You have a great hand in Photography I must say
LikeLiked by 1 person
Thanks Masum, I’m a professional photographer and picked up a camera at age 10. I’m also a Technical Writer, so love to write! 😉
LikeLiked by 1 person
Dear Masum,
Thank you very much for writing this post. I came to your blog first via a search for a review of Baskerville, and enjoyed it so much that I stayed to read more posts 🙂
This is a great guide! I’m planning to set up a site next week, and I appreciate your views about the Block Editor. I don’t want to learn any of the page builders.
Thank you again, and keep writing!
Regards,
Parang.
LikeLiked by 1 person
Sorry for late reply. I appreciate your positive feedback, and I’m glad that I could help you move one step forward towards building your website. And I hope your website will be a great one!
LikeLike
Very helpful. Thank you so much. Wanted to know how to remove the ugly page title from the homepage or any other page. The homepage displays ‘Home’ at the top – how do I get rid of it?
LikeLike